1.1 Giới thiệu Linear Layout
LinearLayout là một view group sắp xếp các phần tử trong nó theo một hướng dọc hoặc ngang, được chỉ định thông qua attribute android:orientation
1.2 Ví dụ giao diện cần tạo

1.3 Code
1.3.1 Code XML
<?xml version="1.0" encoding="utf-8"?>
<!-- Parent linear layout with vertical orientation -->
<LinearLayout xmlns:android="http://schemas.android.com/apk/res/android"
 android:layout_width="match_parent"
 android:layout_height="match_parent"
 android:layout_marginTop="25dp"
 android:orientation="vertical" >
<TextView
 android:layout_width="fill_parent"
 android:layout_height="wrap_content"
 android:padding="5dip"
 android:text="Email" />
<EditText
 android:layout_width="fill_parent"
 android:layout_height="wrap_content"
 android:layout_marginBottom="10dip" />
<TextView
 android:layout_width="fill_parent"
 android:layout_height="wrap_content"
 android:padding="5dip"
 android:text="Password" />
<EditText
 android:layout_width="fill_parent"
 android:layout_height="wrap_content"
 android:layout_marginBottom="10dip" />
 <!-- Child linear layout with horizontal orientation -->
<LinearLayout
 android:layout_width="fill_parent"
 android:layout_height="wrap_content"
 android:layout_marginTop="10dp"
 android:orientation="horizontal" >
<Button
 android:layout_width="fill_parent"
 android:layout_height="wrap_content"
 android:layout_marginLeft="10dp"
 android:layout_marginRight="10dp"
 android:layout_weight="1"
 android:background="#FFD57D"
 android:gravity="center"
 android:text="Login" />
<Button
 android:layout_width="fill_parent"
 android:layout_height="wrap_content"
 android:layout_marginLeft="10dp"
 android:layout_marginRight="10dp"
 android:layout_weight="1"
 android:background="#FF9900"
 android:gravity="center"
 android:text="Cancel" />
 </LinearLayout>
</LinearLayout>
1.3.2 Code Java
package quyetdv.android.layoutbasic;
import android.os.Bundle;
import android.app.Activity;
public class LinearLayoutActivity extends Activity {
    @Override
    protected void onCreate(Bundle savedInstanceState) {
        super.onCreate(savedInstanceState);
        this.setTitle("Linear Layout");
        setContentView(R.layout.linear_layout);
    }
}
2. Relative Layout
2.1 Giới thiệu Relative Layout
RelativeLayout là một view group hiển thị các thành phần con dựa vào mối quan hệ vị trí giữa chúng với nhau hoặc giữa chúng với thành phần cha chứa nó.
2.2 Ví dụ giao diện cần tạo

2.3 Code
2.3.1 Code XML
<?xml version="1.0" encoding="utf-8"?>
<RelativeLayout xmlns:android="http://schemas.android.com/apk/res/android"
 android:layout_width="fill_parent"
 android:layout_height="wrap_content"
 android:layout_marginTop="25dp" >
<TextView
 android:id="@+id/lblEmail"
 android:layout_width="fill_parent"
 android:layout_height="wrap_content"
 android:padding="5dp"
 android:text="Email" />
<EditText
 android:id="@+id/edEmail"
 android:layout_width="fill_parent"
 android:layout_height="wrap_content"
 android:layout_below="@id/lblEmail" />
<TextView
 android:id="@+id/lblPassword"
 android:layout_width="fill_parent"
 android:layout_height="wrap_content"
 android:layout_below="@id/edEmail"
 android:layout_marginTop="10dp"
 android:padding="5dp"
 android:text="Password" />
<EditText
 android:id="@+id/edPassword"
 android:layout_width="fill_parent"
 android:layout_height="wrap_content"
 android:layout_below="@id/lblPassword"
 android:layout_marginBottom="10dp" />
<Button
 android:id="@+id/btnLogin"
 android:layout_width="wrap_content"
 android:layout_height="wrap_content"
 android:layout_alignParentLeft="true"
 android:layout_below="@id/edPassword"
 android:layout_centerHorizontal="false"
 android:layout_centerInParent="false"
 android:layout_centerVertical="false"
 android:layout_marginRight="10dp"
 android:background="#FFD57D"
 android:text="Login" />
<Button
 android:layout_width="wrap_content"
 android:layout_height="wrap_content"
 android:layout_alignParentRight="false"
 android:layout_alignTop="@id/btnLogin"
 android:layout_toRightOf="@id/btnLogin"
 android:background="#FF9900"
 android:text="Cancel" />
<!-- btnGoHome position relative to parent layout -->
 <Button
 android:id="@+id/btnGoHome"
 android:layout_width="wrap_content"
 android:layout_height="wrap_content"
 android:layout_alignParentBottom="true"
 android:layout_centerHorizontal="true"
 android:background="#319DEA"
 android:text="Go to Home Page"
 android:paddingLeft="10dp"
 android:paddingRight="10dp"
 android:textColor="#FFFFFF" />
</RelativeLayout>
2.3.2 Code Java
package quyetdv.android.layoutbasic;
import android.os.Bundle;
import android.app.Activity;
public class RelativeLayoutActivity extends Activity {
@Override
 protected void onCreate(Bundle savedInstanceState) {
    super.onCreate(savedInstanceState);
    this.setTitle("Relative Layout");
    setContentView(R.layout.relative_layout);
 }
}
3. Table Layout
3.1 Giới thiệu Table Layout
TableLayout cho phép đặt các thành phần thành các hàng và cột tương tự như bảng trong html.
3.2 Ví dụ giao diện cần tạo

3.3 Code
3.3.1 Code XML
<?xml version="1.0" encoding="utf-8"?>
<TableLayout xmlns:android="http://schemas.android.com/apk/res/android"
 android:layout_width="match_parent"
 android:layout_height="match_parent"
 android:background="#ffffff"
 android:shrinkColumns="*"
 android:stretchColumns="*" >
<!-- Row 1 with single column -->
<TableRow
 android:id="@+id/tableRow1"
 android:layout_width="fill_parent"
 android:layout_height="wrap_content"
 android:gravity="center_horizontal" >
<TextView
 android:id="@+id/tv1"
 android:layout_width="match_parent"
 android:layout_height="wrap_content"
 android:layout_span="3"
 android:background="#47BDED"
 android:padding="18dip"
 android:text="Row 1"
 android:textColor="#000000" />
 </TableRow>
<!-- Row 2 with 3 columns -->
<TableRow
 android:id="@+id/tableRow2"
 android:layout_width="match_parent"
 android:layout_height="wrap_content" >
<TextView
 android:id="@+id/tv21"
 android:layout_weight="1"
 android:background="#FFB500"
 android:gravity="center"
 android:padding="20dip"
 android:text="Row 2 column 1"
 android:textColor="#000000" />
<TextView
 android:id="@+id/tv22"
 android:layout_weight="1"
 android:background="#FFFA99"
 android:gravity="center"
 android:padding="20dip"
 android:text="Row 2 column 2"
 android:textColor="#000000" />
<TextView
 android:id="@+id/tv23"
 android:layout_weight="1"
 android:background="#FFC03E"
 android:gravity="center"
 android:padding="20dip"
 android:text="Row 2 column 3"
 android:textColor="#000000" />
 </TableRow>
<!-- Row 3 with 2 columns -->
<TableRow
 android:id="@+id/tableRow3"
 android:layout_width="fill_parent"
 android:layout_height="wrap_content"
 android:gravity="center_horizontal" >
<TextView
 android:id="@+id/tv31"
 android:layout_weight="1"
 android:background="#00B9CD"
 android:gravity="center"
 android:padding="20dip"
 android:text="Row 3 column 1"
 android:textColor="#000000" />
<TextView
 android:id="@+id/tv32"
 android:layout_weight="1"
 android:background="#58F5FF"
 android:gravity="center"
 android:padding="20dip"
 android:text="Row 3 column 2"
 android:textColor="#000000" />
 </TableRow>
</TableLayout>
3.3.2 Code Java
package quyetdv.android.layoutbasic;
import android.os.Bundle;
import android.app.Activity;
public class TableLayoutActivity extends Activity {
@Override
 protected void onCreate(Bundle savedInstanceState) {
    super.onCreate(savedInstanceState);
    this.setTitle("Table Layout");
    setContentView(R.layout.table_layout );
 }
}
4. TabHost Layout
4.1 Giới thiệu TabHost Layout
Một TabHost Layout gồm có 3 phần : TabHost, TabWidget và FrameLayout

- TabHost : Là container chính chứa các Tab buttons và Tab contents
- TabWidget : Để định dạng cho các Tab buttons : Nhãn , icon, …
- FrameLayout : là container để chứa các layout cho Tab contens. Chỉ có FrameLayout là view group được dùng cho Tab contents, không thể dùng các loại Layout khác.
4.2 Ví dụ giao diện cần tạo

4.3 Code
4.3.1 Code XML
<?xml version="1.0" encoding="utf-8"?>
<TabHost xmlns:android="http://schemas.android.com/apk/res/android"
 android:id="@android:id/tabhost"
 android:layout_width="fill_parent"
 android:layout_height="fill_parent" >
<LinearLayout
 android:layout_width="fill_parent"
 android:layout_height="fill_parent"
 android:orientation="vertical" >
<TabWidget
 android:id="@android:id/tabs"
 android:layout_width="fill_parent"
 android:layout_height="wrap_content" />
<FrameLayout
 android:id="@android:id/tabcontent"
 android:layout_width="fill_parent"
 android:layout_height="fill_parent" />
 </LinearLayout>
</TabHost>
4.3.2 Code Java
package quyetdv.android.layoutbasic;
import android.app.TabActivity;
import android.content.Intent;
import android.os.Bundle;
import android.widget.TabHost;
import android.widget.TabHost.TabSpec;
public class TabHostLayoutActivity extends TabActivity {
 @Override
 protected void onCreate(Bundle savedInstanceState) {
 super.onCreate(savedInstanceState);
 this.setTitle("TabHost Layout");
 setContentView(R.layout.tabhost_layout);
TabHost tabHost = getTabHost();
// Tab1
 TabSpec tab1 = tabHost.newTabSpec("Tab1");
 tab1.setIndicator("Tab1");
 Intent tab1Intent = new Intent(this, Tab1Activity.class);
 tab1.setContent(tab1Intent);
// Tab2
 TabSpec tab2 = tabHost.newTabSpec("Tab2");
 tab2.setIndicator("Tab2");
 Intent tab2Intent = new Intent(this, Tab2Activity.class);
 tab2.setContent(tab2Intent);
// Tab1
 TabSpec tab3 = tabHost.newTabSpec("Tab3");
 tab3.setIndicator("Tab3");
 Intent tab3Intent = new Intent(this, Tab3Activity.class);
 tab3.setContent(tab3Intent);
// Adding all TabSpec to TabHost
 tabHost.addTab(tab1);
 tabHost.addTab(tab2);
 tabHost.addTab(tab3);
 }
}
5. ListView Layout
5.1 Giới thiệu ListView
- ListView là một view group hiển thị các phần tử dưới dạng một danh sách có thể cuộn được
- Các phần tử được chèn vào ListView bằng cách sử dụng một Adapter lấy dữ liệu từ một nguồn nào đó ( một mảng hoặc một truy vấn dữ liệu )
5.2 Ví dụ giao diện cần tạo
Ví dụ ListView hiển thị dữ liệu đơn giản ( danh sách chữ cái ) từ một mảng String có sẵn.

5.3 Code
5.3.1 Code XML
<?xml version="1.0" encoding="utf-8"?>
<ListView xmlns:android="http://schemas.android.com/apk/res/android"
 android:id="@+id/listview"
 android:layout_width="match_parent"
 android:layout_height="wrap_content" >
</ListView>
5.3.2 Code Java
package quyetdv.android.layoutbasic;
import android.app.Activity;
import android.os.Bundle;
import android.view.View;
import android.widget.AdapterView;
import android.widget.ArrayAdapter;
import android.widget.ListView;
import android.widget.Toast;
public class ListViewLayoutActivity extends Activity {
 private ListView listView;
private final String[] values = new String[] { "A", "B", "C", "D", "E",
 "F", "J", "H", "I", "J", "K", "L", "M", "N", "O", "P", "Q", "R",
 "S", "T", "U", "V", "Ư", "X", "Y", "Z" };
@Override
 protected void onCreate(Bundle savedInstanceState) {
 super.onCreate(savedInstanceState);
 this.setTitle("ListView Layout");
 setContentView(R.layout.listview_layout);
listView = (ListView) findViewById(R.id.listview);
ArrayAdapter<String> adapter = new ArrayAdapter<String>(this,
 android.R.layout.simple_list_item_1, values);
listView.setAdapter(adapter);
listView.setOnItemClickListener(new AdapterView.OnItemClickListener() {
@Override
 public void onItemClick(AdapterView<?> arg0, View arg1, int arg2,
 long arg3) {
 Toast.makeText(getBaseContext(),
 "position = " + arg2 + " ; value = " + values[arg2],
 Toast.LENGTH_SHORT).show();
 }
 });
 }
}
6. GridView Layout
6.1 Giới thiệu GridView
- GridView là một view group hiển thị các phần tử dưới dạng một lưới 2 chiều có thể cuộn được
- Các phần tử được chèn vào GridView bằng cách sử dụng một ListAdapter
6.2 Ví dụ giao diện cần tạo
Ví dụ GridView hiển thị dữ liệu đơn giản ( danh sách chữ cái ) từ một mảng String có sẵn.

6.3 Code
6.3.1 Code XML
<?xml version="1.0" encoding="utf-8"?>
<GridView xmlns:android="http://schemas.android.com/apk/res/android"
 android:id="@+id/gridview"
 android:layout_width="fill_parent"
 android:layout_height="fill_parent"
 android:columnWidth="50dp"
 android:gravity="center"
 android:numColumns="auto_fit"
 android:stretchMode="columnWidth" >
</GridView>
6.3.2 Code Java
package quyetdv.android.layoutbasic;
import android.app.Activity;
import android.os.Bundle;
import android.view.View;
import android.widget.AdapterView;
import android.widget.ArrayAdapter;
import android.widget.GridView;
import android.widget.Toast;
public class GridViewLayoutActivity extends Activity {
 private GridView gridview;
 private final String[] values = new String[] { "A", "B", "C", "D", "E",
 "F", "J", "H", "I", "J", "K", "L", "M", "N", "O", "P", "Q", "R",
 "S", "T", "U", "V", "Ư", "X", "Y", "Z" };
@Override
 protected void onCreate(Bundle savedInstanceState) {
 super.onCreate(savedInstanceState);
 this.setTitle("GridView Layout");
 setContentView(R.layout.gridview_layout);
gridview = (GridView) findViewById(R.id.gridview);
ArrayAdapter<String> adapter = new ArrayAdapter<String>(this,
 android.R.layout.simple_list_item_1, values);
gridview.setAdapter(adapter);
gridview.setOnItemClickListener(new AdapterView.OnItemClickListener() {
@Override
 public void onItemClick(AdapterView<?> arg0, View arg1, int arg2,
 long arg3) {
 Toast.makeText(getBaseContext(),
 "position = " + arg2 + " ; value = " + values[arg2],
 Toast.LENGTH_SHORT).show();
 }
 });
 }
}
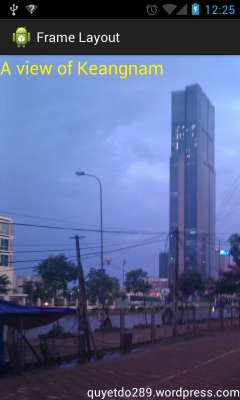
7. Frame Layout
7.1 Giới thiệu FrameLayout
FrameLayout là một vùng chiếm chỗ trên màn hình để hiển thị một nội dung cụ thể nào đó. Phần tử con luôn hiển thị ở góc trên trái của FrameLayout và không thể thay đổi được. Các phần tử sau sẽ nằm chồng lên phần tử trước ( thứ tự trước, sau theo thứ tự trong tập tin xml ).
7.2 Ví dụ giao diện cần tạo
Giả sử bạn cần tạo 1 giao diện hiển thị gồm :
- Một bức ảnh toàn màn hình
- Một dòng chữ giới thiệu vắn tắt ở cạnh trên bức ảnh
- Một dòng chữ ghi thông tin tác giả ở cạnh dưới bức ảnh
7.3 Code
7.3.1 Code XML
<?xml version="1.0" encoding="utf-8"?>
<FrameLayout xmlns:android="http://schemas.android.com/apk/res/android"
 android:layout_width="fill_parent"
 android:layout_height="fill_parent" >
<ImageView
 android:id="@+id/ImageView01"
 android:layout_width="fill_parent"
 android:layout_height="fill_parent"
 android:scaleType="matrix"
 android:src="@drawable/keangnam" >
 </ImageView>
<TextView
 android:layout_width="fill_parent"
 android:layout_height="wrap_content"
 android:text="A view of Keangnam"
 android:textColor="#FFF200"
 android:textSize="24dp" />
<TextView
 android:layout_width="fill_parent"
 android:layout_height="wrap_content"
 android:layout_gravity="bottom"
 android:gravity="right"
 android:text="quyetdo289.wordpress.com"
 android:textColor="#FFFFFF"
 android:textSize="16dp" />
</FrameLayout>
7.3.2 Code Java
package quyetdv.android.layoutbasic;
import android.os.Bundle;
import android.app.Activity;
public class FrameLayoutActivity extends Activity {
@Override
 protected void onCreate(Bundle savedInstanceState) {
 super.onCreate(savedInstanceState);
 this.setTitle("Frame Layout");
 setContentView(R.layout.frame_layout );
 }
}
Post a Comment